Saturday, May 26, 2012

Oatmeal Raisin and Banana Walnut Cookies

I'm always looking for new sweets, with better nutrition, and I was super excited when I came across this recipe while getting my toes 'did' at the nail salon.  I usually detest 'Fitness Magazine' because it's the most repetitive, and sometimes obvious information you could possibly get about nutrition and exercise, but this time, it actually came through.  So, I snapped a quick pic of the recipe with my camera phone, (always think about this when you're out somewhere and want to try a recipe later; who writes stuff down with a pen and paper now a days anyway?), and a couple days later, put the recipe to test.

The original recipe stated that a serving size was four, two-cookie servings, totaling eight cookies.  I decided to make them smaller so they were more of a dessert treat, as opposed to a breakfast cookie, which is what the magazine was shooting toward.  You can do whichever you would like, and it might be a great idea for those of you who are running out of the house in the morning, to try the two cookie servings to get your oatmeal in on the go.


Ingredients:
1 c. Oats, ground
1/2 c. Oats, whole
1 Egg, beaten
3/4 c. Low-fat milk
1 Banana, mashed
1/2 c. Golden raisins
2 tbsp. Flaxseed, ground
2 tbsp. Walnuts, chopped
1 tsp. Cinnamon
1 tsp. Honey
1/8 tsp. Salt
1 tbsp. Stevia


Preheat oven to 350 degrees.  Pulse 1 c. of oats in food processor until they resemble a course powder.  Combine ground oats with the remainder of the ingredients.  Scoop batter onto a baking sheet sprayed with nonstick cooking spray and bake 10-12 minutes for small cookies or 12-14 for large cookies.

This recipe is really easy, but I did find that the consistency was a little loose at first, so I added an additional amount of whole oats until it was a scooping consistency.  Use common sense; if it's too loose add more oats, if it's not, leave it alone.  

Friday, May 25, 2012

Buckwheat Blueberry Pancakes with Blueberry Compote and Vanilla Yogurt-Cream Cheese Topping

A mouthful of a title?  Yes.  A mouthful of blueberries?  Most definitely.  I actually just made these this morning, and despite the fact that I have about five other recipes that I need to post about before this, I really shouldn't be jumping the gun to share this one, but it was so good I couldn't resist.  I also didn't want to forget how I made it before I could get to writing about it.  

My husband and I religiously watch Bobby Flay's Throwdown on Food Network, and recently saw an episode on blueberry pancakes, at which point my husband exclaimed, "You haven't made pancakes in a long time.  You should make blueberry pancakes."  The reality was, I hadn't picked up pancake mix in ages, and the last time I had made pancakes, I had done it by scratch.  Well, his suggestion was I all I needed to get me to pick up the Anson Mills Buckwheat Pancake mix, and start brainstorming my next creation.  

Sometimes I make something so delicious, it's like I can't even believe that it has happened.  This was one of those moments.


Ingredients:
Anson Mills Pancake Mix (6-8 pancake serving)
1/2 c. Fresh blueberries
3 tsp. Cinnamon
3/4 c. Frozen blueberries
1/2 Lemon, juiced
1/2 Lemon, zested
1/8 c. Water
3 tbsp. Stevia
2 tbsp. Non-fat Greek yogurt
2 tbsp. Fat-free cream cheese, at room temp.
1 tsp. Vanilla extract

To make pancakes, prepare the batter to package instructions (for this you will need egg, milk, and oil, so don't think that you have all the ingredients here.  Make sure to check whatever pancake mixture you buy, and see what you need to execute the pancakes).  When the batter is prepared, fold in the fresh blueberries, and 1 tsp. of cinnamon.  Preheat your pan to medium, and pour batter onto sprayed pan, letting cook on one side until bubbles form in the batter, and then flip and cook for an additional 2 minutes on that side.

Meanwhile, in a small saucepan, put 1 tsp. cinnamon, frozen blueberries, lemon juice and zest, water and 2 tbsp. of Stevia, and bring to a slow boil.  Reduce heat to a simmer, and allow to cook down until thickened, stirring regularly to make sure the fruit doesn't burn, and the mixture cooks evenly.  This should take about 10-15 minutes.

In a small bowl, whisk together 1 tbsp. Stevia, 1 tsp. cinnamon, yogurt, cream cheese, and vanilla extract.

To build, place your pancakes on the plate, put a dollop of the yogurt-cream cheese mixture and then cover with the blueberry compote.  In order to keep everything fresh and tasting like it's just built, I would make your yogurt-cream cheese mixture ahead of time, and allow your compote to be cooking while you're getting your pancake batter ready, and cooking.

What I enjoy about the compote mixture, is you can refrigerate it if you have extra, and use it as a jam on toast, or to top other breakfast options.  You can also make your own fruit-on-the-bottom yogurts if you would prefer something fresher than what you pick up in your grocery store.  On top of that, I have left sugar-free maple syrup in the past, and this is such a great way to feel like you're getting your syrupy fix on, without all the fillers and unnatural flavorings.

Give the recipe a try, and you'll never go back to IHOP again for their blueberry pancakes with blueberry syrup.  This is 10 times fresher, better tasting, and probably has half the carbs and calories, and shhh...you're kids will never know it's a healthier version!
Toasted Ciabatta Bread with Pea Pesto and Slice Tomato

You'll never guess where I got this recipe.  What?  Giada De Laurentiis?  Yup, shocking, I know.  For the most part, I kept the recipe the same, but I changed the type of bread I used, and I rubbed the bread with sliced garlic after it had been toasted.  What had drawn me to this recipe, was that I really enjoy pesto, but my husband hates pine nuts.  Because of this, I'm drawn to pesto sauces that don't involve pine nuts, but have a similar texture.  Also, this entire show, 'More for Less', had several recipes that I wanted to try, and this recipe, paired with the Lemon Chicken Soup (I will get to that blog soon), seemed delish!  And so, on the pea pesto journey I went.


Ingredients:
1/2 Loaf day old Multi-grain Ciabatta bread
1 10 oz. Frozen peas, thawed
2 Garlic cloves
1/2 c. Parmesan, grated
1 tsp. Salt
1/4 tsp. Pepper
1/2 c. Extra-virgin Olive oil
2 Roma tomatoes, sliced


To make the pesto pulse together the peas, 1 garlic clove, cheese, and salt and pepper to taste.  With food processor running, slowly add in 1/3 c. of olive oil until well combined.

For toast, use day old bread prior to toasting so you get a really good crunch.  If you don't have day old, you can always toast it in the oven at 350 degrees for 10 minutes.  Slice the bread about 1/4 in. thick, and brush with olive oil.  Place the bread slices on a stove top grill or griddle and toast on each side for 2-3 minutes.  Immediately remove and take one garlic clove, cut in half, and rub the bread with the garlic, sliced side down.  You're basically making a quick garlic bread.

To build, lay the bread flat, top with the pea pesto, and cover with the sliced tomato.  You can add any additional salt and pepper to taste. 

I enjoy the recipe because it's something that you can serve with a soup, or as a passed appetizer at a party. It's so annoying when people offer starters that are near impossible to eat while standing up, or moving around.  For the love, I'm Italian, I talk with my hands, so I need something that can hold up to a little movement while I'm eating!  

Monday, May 21, 2012

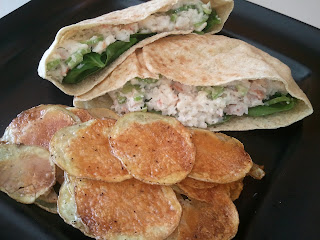
Seafood Salad Pockets with Homemade Potato Chips

I was lucky enough to come across some free jumbo shrimp, and lobster tail, and wasn't exactly sure what I wanted to do with it.  As much as I enjoy both seafood options by themselves, I wanted to make it a whole meal, as opposed to something that my husband and I picked at sitting at the dinner table.  With summer in the air, I decided that it would be a nice treat to have a nice seafood pocket with some potato chips.  *GASP* Potato chips???  Yes, potato is not bad for you, and chips are not bad for you, if you don't go dropping the chips in a giant fryer.  

Although I typically substitute Fat-free Greek yogurt for mayo, every once in a while I have to feed my husband textures and tastes of "real food" in order to satiate his sandwich needs.  *GASP*  Mayonnaise???  Yes, given the right mayo, (I use an Olive Oil based mayo), in a small quantity, it can give you the flavors and textures you crave, without all the crap that's in your typical full-fat mayonnaise.  

Ingredients:
1 lb. Shrimp, cooked, shelled and de-veined
1 Lobster tail, cooked, and shelled
Salt and pepper to taste
1 tbsp. Olive oil based Mayonnaise
1 Celery stalk, thinly sliced
1 tbsp. Lemon juice
1 tsp. Dill
1 Russet potato, thinly sliced
Non-stick Olive Oil spray
1 tbsp. Extra-virgin Olive Oil
1 c. Baby spinach
2 Whole-wheat pockets

To prepare the seafood salad, place the shrimp in a food processor and pulse until you reach a desired consistency.  I like mine small because I keep the lobster chopped into larger chunks, in order to keep the lobster the main texture of the sandwich.  In a medium bowl, place the shrimp, chunked lobster, salt, pepper, mayo, celery, lemon juice and dill and mix.  Season to your liking.  Cut your pocket in half, place your spinach leaves, and spoon in however much seafood salad you would like.  I made a sandwich for both my husband and I, and still had some left over to eat on a regular salad the next day.

To prepare the potato chips, preheat oven on 350 degrees, and thoroughly wash the potato.  When the potato has dried, cut off a small part of one end, take a mandoline slicer set at 1/8" slice, and slice your potato.  Watch your fingers!  If you don't have a mandoline, you can always slice them with a sharp knife, however, unless you're a trained chef (which I am not) getting the slices thin enough for them to bake like real chips is very, very difficult.  

In a bowl, toss the potato slices with olive oil, salt and pepper.  Place them on a large parchment paper lined baking sheet, making sure they are in a single layer.  Place the baking sheet in the oven and allow to cook for 12 minutes.  Turn the slices over, and continue to bake for an additional 5 minutes, checking on them periodically to see if they have browned.  If you want them nice and crispy, you'll want to see them really browned, otherwise the chips will be soggy and chewy.   Allow to cool for about 10 minutes, and serve with your seafood salad pocket, or the sandwich of your choice.  

You can also use this chip recipe with sweet potatoes, if you want an even healthier version.  I just so happened to have used my sweet potato the day before for grilled wedges, so I went with regular potatoes, which was nice because it felt like a day at the beach eating this sandwich with these chips.  
Grilled Arctic Char Tzatziki with Grilled Asparagus

This dish was inspired by a dinner that my husband and I had at Fishbones restaurant in Chelmsford a few weeks ago.  Although salmon is our main superfood, I was intrigued to try something different, and seeing as it is a cross in texture and flavor of salmon, and lake trout, I knew I would love it.  Here, I merely recreated what I saw on a plate, and the flavors that had come out of the sauce when I ate the dish.  

Tzatziki is sauce made with strained yogurt, lemon, garlic, and herbs.  It can contain several different types of herbs and here, I used dill in order to replicate the sauce that I had for dinner.  I love the combination of the sauce with the Arctic Char, particularly because the fish is a lot lighter in texture and flavor than salmon, and therefore, tastes so extravagant with a fancy sauce on top.


Ingredients:
1 lb. Arctic Char, grilled
Non-stick spray
Salt and pepper to taste
1/2 c. of Fat-free Greek yogurt
2 tbsp. Lemon juice
1 tbsp. Lemon zest
1 tbsp. Dill, dried or fresh
1/2 Cucumber, peeled and diced
1 tbsp. Olive oil
1 lb. Asparagus, washed and stemmed and grilled


To prepare your Tzatziki sauce mix the yogurt, lemon juice, lemon zest, dill, cucumber, and salt and pepper to taste, in a bowl.  Allow flavors to marinate together for at least 20 minutes, refrigerated.  Make sure you taste the sauce, and season to your liking, because yogurt can be extremely tangy, especially mixed with lemon zest and juice.  You need to find the balance that works for your palate.

Preheat your grill to medium-high, and take the asparagus, tossed with some Olive oil, and salt and pepper to taste, and place it directly on the grill.  The asparagus needs to be watched closely, because it will not take longer than 5-7 minutes to grill directly on the grate, and needs to be turned continuously.  Take the stalks off as the appear to be done.

At the same time, place a large piece of aluminum foil on the grill, generously sprayed with non-stick spray.  Place the Arctic Char, seasoned with salt and pepper to taste, and place it skin down onto the aluminum foil.   Like salmon, Arctic Char will not take long to cook, and really doesn't need to be on each side for longer than 4-5 minutes.  I would suggest using a spatula to turn, as tongs will just break the fish apart.  When both sides have been cooked, remove the fish from the grill, and allow to cool for about 5 minutes.

Take your Tzatziki sauce out of the fridge, and place a generous amount over the fish, and plate with your asparagus.  You'll find that the flavors of the fish, with the sauce, are very complimentary, and light, especially paired with a nice light vegetable like asparagus.

A couple of notes on preparing the fish.  You could always place the fish directly on the grill, but I have found, that if the grate is at all sticky, the fish will just break apart.  So, with this approach, you get almost an indirect heat, but still retain the flavor of the charcoal.  If you're not able to grill, you can always pan-sear the fish, and oven roast the asparagus.  I personally don't eat the skin of the fish, but if you enjoy it, more power to you.  You can either leave it on and eat around it, or peel it off when you take it off of the grill.

Find your closest fish store with a variety of fish, and try something new today.  And, be inspired by the dishes you order when you go out.  Think about something you'd like to recreate when you get home, instead of something you can make at home, but are too lazy to create.    


Saturday, May 19, 2012

Grilled Sea Scallops

When my husband and I fire up the grill, WE GRILL!  The scallops stumbled onto our grill because we were planning on doing Bison burgers, and I stopped at the Fish Market to get Arctic Char, so we figured, why not some grilled Sea Scallops?  Super easy, and although some people consider scallops a fatty seafood, they are a very good source of nutrients that promote cardio-vascular health with vitamin B-12, Omega-3 fatty acids, magnesium and potassium.  That's all the information I need to convince me to eat grilled scallops.  SOLD!


Ingredients:

8 Sea Scallops
1/2 Lemon, juiced
1/2 Lemon rind
2 tbsp. Extra-virgin Olive Oil
1 Garlic clove, diced
Salt and pepper to taste


Always make sure to rinse and soak your scallops for at least 10 minutes, if you don't, you end up with seafood that tastes like pee.  No joke.  I made seafood chowder once, forgot to do this, threw them in the chowder, and my husband and I were choking it down.  

Mix the lemon, lemon rind, olive oil, and garlic in a small bowl.  If you get jumbo sea scallops, you won't need to skewer them, so lay them on a plate, and brush them with the olive oil and lemon marinade.  Sprinkle with salt and pepper.  I love the flavor of fresh seafood, so I find it unnecessary to marinate them, and instead let the natural flavor be the dominate taste, and use the other seasonings to enhance the flavor.  

Place the scallops on a grill heated to medium-high.  Let them sit on the grate for about 4-5 minutes before turning them.  Flip, and let them cook for another 4-5 minutes.  Too many people overcook scallops, and then end up with a rubbery texture.  Let them get nice and seared, but don't cook them all the way through, unless you prefer them that way.  
Spinach, Mushroom & Chicken Sausage Frittata

It's pretty evident that in order to eat healthy on a regular basis, it helps to have meals that are already made and ready to go in the fridge.  I find this especially helpful for my husband because he works mornings, and doesn't always have time to make a breakfast before he heads out of the house.  I don't know why it took me so long to give this recipe a try, but it was definitely great to have something already made, and that could be portioned away for when one of us needed a quick breakfast in the morning.  And, for the love, if I'm not using my cake pans for cake, then I'll use them for my eggs!


Ingredients:
3 c. Baby spinach
1 c. Mushrooms, your choice, diced
2 Chicken sausage links, your flavor choice
8 Eggs, scrambled
4 oz Reduced-fat goat cheese, or cheese of your choice


Preheat oven to 350 degrees.  In a saute pan heated on medium, sprayed with non-stick spray, saute mushrooms for about 5 minutes, or until soft, and add the spinach and cook until wilted.  Remove from pan.  

Slice the chicken sausage (I like to remove the casing because I find it to be a little bit chewy), re-spray the pan, and saute the sausage until browned (most chicken sausage is already cooked, but I like the flavor of a re-heated link).  Remove from pan and let cool about five minutes.

Spray the 9 in. pie pan with non-stick spray, and then lay the sliced chicken sausage on the bottom of the pan, covering the entire pan.  On top, spread out the mushroom and spinach mixture.  Take the scrambled eggs and pour them over the chicken sausage, mushroom, and spinach mixture. Top the mixture with crumbled goat cheese.  (You'll notice here that one side varies from the other.  This is because my husband doesn't like goat cheese, so I did one side with goat cheese, and the other with non-fat mozzarella.)

Place the pie pan in the oven for 12-15 minutes, or until cheese is bubbling and eggs are firmly set.  Let cool for about 5 minutes and serve immediately, or cut into 8 wedges and portion them away for later use.

I liked to pair this breakfast with 1/2 an English muffin or a piece of fruit.  By itself, the frittata wedge can be a little bit light, so eating something else filled me up a little bit more.  Remember, the frittata's greatness lies in the fact that it can be a vehicle for almost any protein and vegetable.  Take whatever you have in your fridge, throw some scrambled eggs over it, and bake away.  You'll find that this can be an extremely versatile dish, and great for left-overs.   

Friday, May 18, 2012

Beef Osso Bucco Over Parsley Parsnip Puree

Who doesn't love Osso Bucco???  Veal, pork, beef, whatever.  Slow cooked meat with vegetables is just plain ol' delish!  The restaurant I work in has done several different versions of an Osso Bucco appetizer, and at some point a light bulb went off and I decided that I absolutely needed to try making my own.  I ended up going with beef primarily because it was what was available in my grocery store at the time that I was inspired to try this recipe, and I already had most, if not all, of the ingredients, outside of the meat, available in my house.  

The Osso Bucco recipe is inspired by a dish I found on Food Network's website, and of course, was a Giada recipe, however, mine is so drastically different, that I can't even give you the link because you won't recognize it.  Likewise, the Parsnip Puree was also inspired by a Tyler Florence recipe, but I changed it up quite a bit by substituting soy milk and parsley in order to carry the parsley flavor throughout the entire dish.  This was, indeed, a huge hit in my house, and is something that I will continue to make over the years.  Give it a try, and if you want, take my recipe, mix it up a bit, and call it your own!

Ingredients:
Osso Bucco:
3 whole Beef Shanks, trimmed
1 tbsp. Whole Wheat flour
2 tbsp. Extra-virgin Olive Oil
1 small White onion, diced
2 Carrots, diced
2 Celery stalks, diced
2 Vine tomatoes, diced
1 tbsp. Tomato paste
4 c. Beef stock
2 whole garlic cloves
1 dried Bay leaf
1/4 c. Parsley, chopped

Parsley Parsnip Puree:
1 lb. Parsnip, peeled and coarsely cut
1/2 Unsweetened Soy milk
Salt and pepper to taste
2 Garlic cloves, sliced
1/4c. Parsley, lightly chopped
2 tbsp. Extra-virgin Olive Oil

Pat dry the beef shanks, and trim.  Cover all sides of the shanks with whole wheat flour.  In a 4-quart pot, heat 2 tbsp. of oil, place the beef shanks in the pan, and brown on all sides.  Remove the meat from the pan, and place aside.  

Place the onion, carrots, and celery in the pot and saute until soft, about 8 minutes.  Add the tomatoes, tomato past, beef stock, garlic cloves and bay leaf.  Return the beef shanks to the pot, and bring to a boil.  Reduce to a simmer, and allow to cook for approximately 1 1/2-2 hours.  Add chopped parsley within the last 15 minutes of cooking.  Remove bay leaf before serving.

In the meantime, you can either cook the parsnips by placing them in a pan and covering with water, and bringing them to a boil, then simmering until tender (about 15 minutes), or steam them until cooked through.  When cooked, (a fork should easily pierce them), place the parsnips into a food processor.  In a saucepan, place the soy milk, garlic cloves and parsley over medium-high heat.  Reduce heat and allow to simmer for about 5 minutes.  Remove from heat, and strain out the garlic and the parsley.  

Puree the parsnips in the food processor until smooth.  Slowly at the olive oil while pureeing.  When smooth, then add the soy milk, garlic, and parsnip mixture to the food processor while pureeing.  Puree until it is a texture you like.  Add salt and pepper to taste.

To present, place about a 1/4 cup of the parsnip puree in a bowl, top with part of the beef shank (it should be falling apart at this point), and then ladle over some veggies and stock from your pot.

This is such an easy dish to execute, although there may seem to be a lot of steps.  I would recommend trying it if you want to impress your in-laws or friends.  If you plate it right, they'll think they're dining at some fancy restaurant instead of sitting at your dinner table!


Clean Eggs Benedict

Egg whites.  All by itself, another boring ingredient.  When my husband and I first starting eating clean, all I knew to do was make egg whites scrambled, or make an omlette.  Needless to say, after two months, my husband objected, and said he just couldn't eat any more egg whites.  So, in my food journey, I am always looking to modify, and build on any breakfast recipe that contains egg whites.  

This recipe is courtesy of The Best of Clean Eating, although I pretty much halved the recipe, changed the type of mushrooms, and used Fat-free Cheddar cheese.  I also changed the order in which the recipe is executed, because I wasn't about to use three pans in order to make one egg-white based dish.  Sorry, but I don't own a dishwasher, and it turns out my personal maid is on a permanent vacation.  

Ingredients:
Non-stick Olive Oil spray
3 c. Baby spinach
1 c. Mushrooms, diced
Olive Oil cooking spray
5 Egg whites, scrambled
1 tbsp. whole-wheat flour
1/2 c. Skim milk
1/4 c. shredded Fat-free Cheddar cheese
Salt and pepper to taste
2 Sprouted grain English muffins, toasted


Heat a saute pan on medium heat, spray with non-stick spray, and saute mushrooms for about 5 minutes.  Add the baby spinach and saute until spinach is wilted.  Season lightly with salt and pepper, and remove from pan.

Spray the pan again with non-stick spray, and add your egg whites.  Scramble egg whites for about 5 minutes, until cooked through.  Season lightly with salt and pepper and remove from pan. 

To the same pan, over low-medium heat, add 1 tbsp. of whole-wheat flour, and skim milk.  Whisk these ingredients together until the mixture becomes thick.  It can take any where from 4-6 minutes.  Just as it starts to thicken, add your Fat-free cheese and whisk until smooth.  If you find that the sauce is to thick, add more milk, one tablespoon at a time.

On your toasted English muffins, place egg whites, topped with the spinach and mushroom mixture, and then topped with your cheese sauce.  

You may find that although this technically makes two servings, one half of the English muffin may be filling enough.  In that case, save the other half for a snack later, or for breakfast the next day.  Remember, the easiest way to stay on track and stay clean, is to make extra, keep your left-overs, and use them as a snack or meal at a later time.  


Mediterranean Tilapia Sandwiches

Ahh Giada, how I love your ability to provide recipes that I can so easily transform into a clean sandwich.  The original recipe for this sandwich uses halibut instead of tilapia, but as I was in a fish store, and forgot what type of fish I needed to execute the dish, I went with tilapia, came home, looked up the recipe, and realized it was halibut.  What is a girl to do except try it with a different fish?  And so, substituting tilapia for halibut, and removing the mayonnaise and replacing it with Fat Free Greek yogurt, I put my mixing bowls and saute pan to work, crossed my fingers and hoped for the best.   What was created was yet another dish that my husband and I sat eating, and with every bite just made moaning noises about how exceptional the sandwich was.  Might I add, nothing compares to toasting bread brushed with Olive Oil, and then rubbed with fresh cut garlic.  It will change your sandwich eating world forever!

Ingredients:

Fish:

  • Olive oil cooking spray
  • 1 (12-ounce) or 2 (6-ounce) center-cut tilapia fillets, skinned
  • 1/2 teaspoon kosher salt
  • 1/4 teaspoon freshly ground black pepper
  • Extra-virgin Olive Oil, for drizzling

Bread:

  • 1 loaf whole grain ciabatta bread, ends trimmed, halved lengthwise
  • 2 tablespoons extra-virgin olive oil
  • clove garlic, peeled and halved

Filling:

  • 3 heaping tablespoons Fat Free Greek yogurt
  • 1/4 cup chopped sun-dried tomatoes
  • 1/4 cup chopped fresh basil leaves
  • 2 tablespoons chopped fresh parsley leaves
  • 1 tablespoon capers, drained
  • Zest of 1 large lemon
  • 1/2 teaspoon kosher salt
  • 1/4 teaspoon freshly ground black pepper
  • 2 cups baby spinach
To cook the fish, season with salt and pepper, and cook for about four minutes on each side in a saute pan pre-heated to medium.  Allow the fish to cool for about ten to fifteen minutes.  

For the bread: Preheat a grill pan or a large nonstick skillet over medium-high heat. Remove some of the dough from the top half of the bread. Brush the cut-sides of the bread with olive oil. Grill the bread until golden, 1 to 2 minutes, and rub the cooked surface with the cut side of the garlic.
For the filling: In a medium bowl, combine the mayonnaise, sun-dried tomatoes, basil, parsley, capers,lemon zest, salt, and pepper.
Using a fork, flake the cooked fish and add to the filling. Mix until incorporated. Place the filling on the bottom half of the bread. Top with arugula. Add the top half of the bread and cut into 4 equal-sized sandwiches.


Cinco de Mayo Mexi-Burger

I feel like Joey on Friends.  As I'm looking through my pictures, there has recently been a whole lot of burgers and sandwiches.  I'm not sure where this sudden urge to make sandwiches came from, but apparently, I was feeling the burger/sandwich craving the last couple weeks.  

The idea for this burger came from a recipe book, but morphed into my own little creation when I made my own salsa, and mixed it right into my ground turkey meat.  It made for a very light, citrus-flavored meat, as opposed to traditional savory burger.  

Ingredients:
2 Vine ripe tomatoes, diced
2 tbsp. Cilantro, chopped
1/2 Yellow onion, diced
Zest of 1/2 Lime
Juice of 1/2 Lime
Sea salt and fresh ground Black Pepper
1lb. Ground turkey breast
4 Slices of Mexican cheese, your choice
1 Avocado, sliced
1 Vine ripe tomato, sliced
1 c. Baby spinach
4 Multi-grain Sandwich Flats

Take the first seven ingredients and mix them well in a bowl.  Let them marinate in your fridge for up to one hour.  Then, form them into four patties and either grill them, or pan sear them.  Turkey should be cooked through, so depending on the size of your burgers I would say about 5 minutes on each side.  As Bobby Flay would say, any burger should only be turned once, and don't go squishing down on the poor thing, squeezing all of the yummy juices out of it!  Leave the darn thing alone, flip it, and in the last minute, throw your cheese on to melt.  As with any meat, let your burger rest so that all the juices can get nice and comfy inside your burger. 

Set up your burger "bun" (or muti-grain flats) with your avocado slices, tomato slices, and spinach.  Top it with your Mexi-Burger, and voila, a nice light, refreshing turkey burger, that tastes more like spring, than the weighed-down, greasy BBQ burger you're used to.

On a side note, because there is lime juice, and tomato in the burger, you'll find that they do release a fair amount of juices while you're eating them, so make sure you keep your napkin close by, and don't attempt to make this your lunch while you're driving down 495 in your car.

Saturday, May 12, 2012

Salmon Melts

I like to melt cheese on anything, therefore being able to eat salmon, a Powerfood, and then melt some cheese on it, made it me a happy little cook.  The original recipe in The Best of Clean Eating states that the recipe yields 6 sandwiches.  I'm not sure what 3 year old is eating these sandwiches, but there is no way this amount of meat yields six servings. I will say you can get four good servings out of this dish, and remember, when you get your fish, it's weighed with the skin on, so get a little over half a pound.  

Ingredients:
1/2 lb. Salmon fillet
1 large Carrot, peeled and shredded
2 Celery Stalks, trimmed and diced
1 Medium yellow onion, finely diced
6 oz. nonfat plain Greek yogurt
2 tsp. Dijon mustard
3/4tsp dried dill
Zest of 1/2 lemon
Juice of 1/2 lemon
1/4 tsp. Spanish paprika
Seas salt and fresh ground black pepper
8 slices of Food for Life Sprouted 7 Grains Bread
1 Roma tomatoes, sliced
4 Slices low-fat Provolone cheese

Cook your salmon fillet in a non-stick skillet on medium, meat side down, for two minutes.  Flip and cook skin side down for two minutes (you can do longer if you prefer your meat cooked all the way through).  Remove the fillet from the skillet, let the meat cool, and remove the skin and discard.  

In a large bowl, use a fork to flake the salmon.  Add the carrot, celery and onion to the salmon.  Stir to combine.  

In a medium bowl, whisk together yogurt, mustard, dill, lemon zest and juice and paprika.  Season with salt and pepper.  Pour yogurt mixture over salmon-vegetable mixture and stir until well-combined.  

Toast your bread in the toaster, and preheat your broiler to high.

Arrange the bread on a baking sheet, and divide the tomato slices evenly among the bread slices.  Top eat slice with the salmon-vegetable mixture, dividing evenly.  Place the cheese slices on top of the salmon mixture.  Broil on high for three minutes.  Remove from heat, top with four remaining slices of toast and serve immediately.  


When I used the left over meat for these sandwiches, I actually saved it in a tupperware, and then repeated the prep and broiling process before I ate it again.  I would suggest this approach if you think you're going to reuse your left overs in this fashion, because it will keep your bread from getting soggy and mushy.  The meat itself is fantastic should you decide to have a sandwich one day, and then place it on top of a salad the next.  


Monday, May 7, 2012

Seafood Corn Chowder

On to another one of husband's favorite dishes, and one that he asks for whenever he's craving a nice creamy, seafood dish, the Clean Eating Magazine's Seafood Corn Chowder.  If you're looking for great, fresh recipes, with less fat, and more Powerfoods, this is a magazine that is a must in your household!  I'm a recipe hoarder, where I cut out the recipes in the magazine, and put them into my Food Book Organizer that my friend Rachel got me for Christmas one year.  Seek one out, and start cutting out your favorite recipes and food ideas.  You'll be happy you have something easy to access when you want to try something different and new.

Ingredients:
1 tbsp. Extra-virgin olive oil
1 White onion, chopped
2 Large carrots, chopped
2 Celery stalks, chopped
Sea salt and fresh ground black pepper to taste
1 Jalapeno pepper, chopped
1 tsp. Smoked paprika
3/4 tsp. Dried thyme
1 lb. Russet potatoes, peeled and chopped
3 c. Frozen corn kernels
1 c. Non-fat milk
3/4 lb. Sea scallops
1/2 lb. Medium shrimp, peeled and deveined
3 Scallions, white and light green parts, thinly sliced

Heat oil in a large stockpot on medium.  Add onion, carrots and celery; season with salt and black pepper and cook until soft, about 8 minutes.  Add jalapeno, paprika and thyme and cook for 1 minute, stirring well. Add 3 cups water, increase heat and bring to a boil.  Add potatoes and reduce to a simmer until just tender, 7 to 8 minutes.  Add corn and milk; season with salt and black pepper, and simmer for 3 more minutes.  Remove from heat.

Pour 3 cups corn mixture into a blender, covering opining loosely with a kitchen towel to prevent splatters, and puree.  Transfer puree back to pot, stir to combine and return to medium heat; bring to a simmer.

Add scallops to pot and simmer for 3 minutes (time should begin when liquid returns to simmer).  Add shrimp and simmer for 2 minutes or until shellfish are opaque in center.  Remove from heat and taste for seasoning.  Ladle into bowls, sprinkle with scallions, dividing evenly, and serve.

A couple of warnings and notes about this recipe.  First off, when adding the jalapeno, you can choose to remove the membranes and seeds, which will decrease the heat of the chowder.  Should you choose to leave them in, be warned that this is spicy, and you may be wishing you could actually taste the seafood. If it's your first time trying this recipe, choose to do it without, and then decide if you would like more heat in your bowl.   Secondly, you'll notice that I did not garnish my seafood chowder with scallions, and this is because my husband has an allergy to raw onion, and anything that contains an onion like juice flavor, but don't be fooled, the chowder is still quite delicious, with or without the garnish.


Slow-Cooker Mushroom Barley Risotto

Every once in a while I pick up a Crock Pot cookbook because I love when I can just put something in a pot and walk away.  Who doesn't?  We all love great tasting food, but why does it seem like we are always slaving over the stove to create it?  Well, we don't have to, and the Crock Pot is the solution to saving time and energy.  This recipe made it's way to my kitchen via The Complete Series: Slow Cooker, which is a great Crock Pot companion for the clean eating individual.  I'm not going to lie, this recipe needs some TLC on the stove before it makes it's way into the pot, but I promise that the end result makes the preparations well worth the time and effort!


Ingredients:
1 tbsp. Olive oil
1 Onion, diced
1/2 lb. Button mushrooms, coarsely chopped
3 large Portobello mushrooms, sliced
1/4 c. Fresh parsley, chopped
1 tbsp. Fresh thyme, chopped
2 Garlic cloves, crushed
3/4 c. Pearl barley
4 c. Vegetable stock
2 tbsp. tomato paste
Salt and freshly ground black pepper
1/4 c. Parmesan cheese, grated

Heat the oil in a large saucepan over medium heat.  Add the onion, and saute for 4 minutes.  Add all the mushrooms and saute until golden brown, about 15 minutes.  Add the parsley, thyme, garlic and barley and stir for 1 minute.

Transfer all of the mushroom mixture to a slow cooker set on high, add 4 cups of stock, cover and cook until liquid is almost absorbed and barley is almost tender, about 3 hours.

Stir in the tomato paste, check for seasoning and cook for 1 more hour or until the barley is tender and the mixture is creamy.  At the end, stir in the Parmesan cheese and season again if necessary.  

Although this dish takes a few hours to create, I find it much more manageable then stirring my risotto for and hour and a half, standing over my stove, frustrated that the sauce isn't thickening.  Instead, I just check in on it a couple times, go about my daily household duties, and come back to it when it's done.  It is so creamy and delicious, it's hard to believe it's vegetable based and that just one cup is enough for any lunch or dinner!
Spinach Citrus Salad

This Spinach Citrus Salad is a dish that I like to prepare when I'm eating a protein that is fairly heavy in comparison, and when I want something to really clean my palate after the dish.  Whereas most people like to eat salad prior to their main dish, this is a salad I like to finish of with because of how light it is, and also because of how sweet and fresh it tastes.  

Ingredients:

3 c. Baby spinach
1 Grapefruit, segmented
1 Orange, segmented
Zest of one orange
Zest of one lemon
2 tbsp. Pecans
Salt and pepper to taste
2 tbsp. Olive oil
2 tbsp. Balsamic vinegar


In a large bowl combine the spinach, grapefruit, orange, and the zest of half of the lemon, and half of the orange, and top with pecans.  When you segment the fruit, use the remainder of the juices for the dressing.  In a separate small bowl with these fruit juices, zest the remainder of the lemon and orange, and the balsamic vinegar.  Whisk together all the ingredients, and slowly add the olive oil while whisking the mixture so you emulsify the liquids.  Add salt and pepper to taste.  Toss the dressing with the salad immediately before serving.
Bad-Ass Bison Burgers

I love a good burger, but I very rarely CRAVE a burger to the point of breaking.  My husband however, can dream about a good burger for an entire month, waiting until he feels he "deserves" his burger and then sits down at a restaurant, napkin in hand, with fingers ready for french fry dipping. 

The idea of trying the bison burger came primarily out of the fact that I was finishing up a round of P90X, and I wanted to go to Kimball's Farm to get ice cream, and I had been planning this for about a month.  Three days prior to this, my husband turned to me and said, I know you want to get ice cream, but I really want a Gibbet burger.  Well, too bad for him. I wasn't coming into work on my day off, when I was supposed to be eating ice cream, so that he could have a burger.  And so, to the ground bison I went to satiate his burger craving.  


Ingredients:

16 oz. Ground bison meat
2 Bakery whole wheat ciabatta rolls, toasted
Salt, pepper, garlic powder to taste
1/2 Yellow onion
3/4 c. Chopped mushroom
Cheese of your choice
1 Roma tomato
1/2 c. Romaine lettuce


I'm sure, by know, you're all aware that I grill my meat as often as  possible, so of course this is the cooking approach that I took with the bison burger itself.  The only ingredients I add to the meat is the salt, pepper, and garlic powder, and I then form the meat into two patties (yeah, I like an 8 oz. burger, no matter how unnecessary that may be).  Prior to throwing the bison on the grill, I caramelized the onion and mushroom by sauteing them in a non-stick pan over medium heat, so it would be ready to place on the burger as soon as the burger is done.  

While the bison is cooking on the grill, spray the buns with a little bit of olive oil, and throw them on the grill to toast.  Because bison is an extremely lean meat, the recommended temperature for the meat is between medium rare or medium.  If you prefer your meat more done than this, I would warn you that bison tends to get dry and tasteless once you go too far into medium well.  Both myself and my husband have grilled meat in restaurants, so as far as temperature goes, we can tell how far along the meat is just by touch and look, but use a meat thermometer if you need to.  

Once the meat hits medium rare, I top the burger with the mushroom and onion, and then place the cheese on top to melt (in this case I used a goat chevre, although on my husbands, I used a Swiss cheese).  I then placed some chopped Romaine lettuce and sliced Roma tomato to the bun, and then took a giant bite into one of the best burgers I've probably every had.  My husband actually looked at me after his first two bites and said, "I could never eat a ground beef burger again, and totally be OK with it!"     

The reality is, that bison meat is far more expensive than ground beef (about $8 for a pound of bison), but you are paying for the health benefits of bison, and when you see the comparison of fats and nutrients to several other meats, it's obvious why bison can be the better choice.  


Sunday, May 6, 2012

Easy Breakfast Options: Your Grains, Egg Whites, Soy Sausage and Grapes

As nice as it is to make all sorts of fancy, flavorful breakfasts, the reality is that we all need some breakfast options that don't require a trip to the grocery store, and a list of instructions.  This is one of my go to breakfasts, and I feel like it incorporates all the food groups that you need to get yourself going in the morning.  


Ingredients:

1 slice of 7 Sprouted Grains Bread
2 Egg whites, scrambled
Fat-free cheese of your choice
1 small patty of Gimme Lean Ground Soy Sausage
Fruit of your choice


This breakfast is so great because the concept can be put together in so many different ways.  Sometimes I use the 7 Sprouted Grains Bread, sometimes I use an Organic English Muffin.  Sometimes I use two egg whites, sometimes I use one whole egg with yolk.  Sometimes I use Fat-free Mozzarella, sometimes I use Fat-free Cheddar, and sometimes I use grapes, and sometimes I eat half a grapefruit.  But, all the time I make sure that I'm incorporated some grains, some soy, some fruit and some egg.  

Breakfast doesn't always have to be fancy, but it can always be simple and tasty!
Pumpkin Custard

Who doesn't love Pumpkin Pie?!?  I know that my husband loves it, but the traditional pumpkin pie has a carb-loaded crust, and boat loads of sugar.  This was a great recipe that I also came across on Oxygen Magazine's online recipe finder, and it was so simple, I almost didn't know what to expect.

                  Pumpkin Custard


Ingredients:

2 c. Canned pumpkin
3 Egg whites
12 oz. Evaporated, non-fat milk
1 tsp. ground cinnamon
1/2 tsp. ground ginger
1/4 tsp. ground cloves
2/3 c. Stevia


Preheat your oven to 425 degrees, whisk all of the ingredients together in a large bowl, and pour into a greased 9 in. pie pan.  Bake for 15 minutes, and then turn the oven down to 350 degrees and continue baking for 40 to 50 minutes, or until an inserted knife comes out clean.

This was an amazing dish to come across, mainly because I am a huge sugar fan, so finding something else that is a dessert, was so exciting.  It's much lighter than your traditional pumpkin pie, but it satisfies all the cravings that you have when you're thinking about eating a pie.  On top of all of this, the total bonus was that it was another recipe that incorporated the Superfood Pumpkin!!!  
Baked Pumpkin Spice Oatmeal

In reading Superfoods Rx, I had been trying to figure out exactly where I was going to fit pumpkin into my regular diet.  I am well aware that pumpkin pie is definitely not a superfood, and clearly could not be used in my diet (or so I thought until I moved onto the Pumpkin Custard I made shortly after), and so I wanted to figure out where I could fit it into my breakfast.  This was a great recipe to find from one of my favorite online sources, Oxygen Magazine, and their Baked Pumpkin Spice Oatmeal.

Ingredients:

1/2 c. Old-fashioned oats
1 c. Water
1/4 c. pumpkin puree
2 tbsp Nonfat cottage cheese
1/4 tsp. Baking Powder
Dash of Sea Salt
1/4 tsp. Cinnamon
1/2 tsp. Vanilla
1/8 tsp. Allspice


Preheat your oven to 350 degrees, combine all the ingredients in an oven-proof bowl, mix thoroughly, and bake for 30 minutes.

The original recipe on the website is for one serving of oatmeal, and for my household it made no sense to make one serving of a food that contained this many ingredients, so I decided to quadruple the recipe so that I had four servings to last us a couple of days.  Whenever you change a recipe like this when baking, it obviously changes the texture and cook time.  So, instead of cooking the dish for 30 minutes, I cooked it for about 1 hour and 20 minutes, until the oatmeal was bubbling and set.  

Both my husband and I loved this recipe, and it was so great to reheat with a little bit of milk in the morning. The one things that I would have done differently would be to cook it in a rectangular baking pan so that the cooking time decreased, and the middle set a little more than it did in the loaf pan.  

Saturday, May 5, 2012

Turkey Burrito with Avocado Salsa

This is, hands down, my husbands favorite dish that I make.  Yesterday we were on our way to the grocery store, and he was talking about how the fridge had nothing in it.  I replied that it just felt that way because it wasn't jammed full of tupperware.  He replied that there was so much stuff we needed that was missing .  I laughed and asked what was missing.  He then replied, "Well, I know it's missing turkey burritos!" 

And that it was.  The funny thing is, the turkey burrito was born much out of happenstance, where I had all the ingredients, and husband wanted to feel like he was eating "real food."  It pretty much evolved from a turkey scramble (ground turkey mixed with a bunch of different vegetables and rice) to what is now a staple in our household: The Epic Turkey Burrito


Ingredients:
Whole Wheat Wraps
1 lb. Ground Turkey
1 Onion, diced
Salt and pepper to taste
Cajun seasoning and red pepper flakes to taste
I can Black Beans, rinsed
1 c. Quinoa, cooked
1 Roma Tomato, diced
1/2 Avocado, diced
1/4 c. Corn
1 tbsp. Lemon juice
1 Jalapeno, diced
Non-fat cheddar cheese
Non-fat Greek yogurt
1/2 c. Romaine lettuce

I saute the onions first to make sure that they are nice and carmalized.  I then add the ground turkey and cook through, seasoning with salt, pepper, Cajun seasoning and red pepper flakes to taste.  In the meantime I prepare my quinoa to package directions.  When the turkey is cooked through, I add the black beans, and quinoa to the pan and heat until everything is warmed through.

Ahead of time I prepare the Avocado salsa by taking the Roma tomato, avocado, corn, lemon juice, and jalapeno and mixing in a small bowl.  I also add salt and pepper to this to taste. 

To prepare the burrito, I warm the tortilla or wrap in the microwave for 15 seconds, and start to top first with Fat-free Greek yogurt in place of sour cream, lettuce, Non-fat Cheddar cheese, the avocado salsa, and then the turkey mixture.  After this, you just do your best to fit it all in the wrap, and keep a paper towel close by to sop up the mess that result from eating.  

I also love this dish because it makes left overs for at least a day or two, and if you run out of wraps, or just don't feel like adding the extra carbs to the dish, you can always do what husband and I do, which is turn it into, what we like to call, Turkey Burrito Bowl.  


Super-Easy Walnut Crusted Salmon

Ahh, salmon, we meet again.  In looking to always change up my salmon prep for dinner, I came across a couple of recipes that used a walnut crust, and an almond flour crust.  I had traditionally cooked salmon either by itself, or brushed with this awesome agave nectar with a little salt and pepper, but I was looking forward to trying something with a little more crunch, and a little more warmth.  This was super easy, and took almost no time.  


Ingredient List:

1/2 lb. salmon filet
1/8 c. of chopped walnuts
Dash of cinnamon


Most people expect that in order to put a crust on a protein you need to do an egg wash, or something wet in order to get the nuts or flour to stick.  Salmon, luckily, tends to be on the moist side, so there was really no need to dip the filet in any eggs.  All you need to do is chop the walnuts however fine you like the texture, dip the salmon in the nuts and press down to make them stick, sprinkle some cinnamon on top, primarily to add some warmth to the dish, and place in a non-stick sprayed pan, pre-heated to medium.  Sear on each side until the salmon is cooked to your liking.

I often prepare a green side dish with my salmon, but choose whatever you like to pair with your fish.  I'm lucky enough to have some really great pans to steam my greens really easily, so I tend to throw them on with a little seasoning and just leave them until my steam pan screams at me and tells me their done. Pick something relatively easy so you feel like you're getting a fancy dish, but you're really not doing a whole lot of work with either your protein, or your side dish! 

Tuesday, May 1, 2012

Salmon Cakes with Steamed Broccoli

How much grilled/pan seared salmon can one person really eat?  I swear to the food gods, that my husband and I ate salmon fillets every week, once a week, for two months straight.  We pan seared it with seasonings, we grilled it with seasoning and agave nectar, we put it on salads.  I mean seriously, at some point, you look at that salmon fillet and you actually passionately hate it's existence, even if you love the flavor.  

So, in not wanting to hate my salmon anymore, I started brain storming how I could turn salmon into a "cake" and pan sear it that way.  I work in a restaurant that makes crab cakes, so I started here, and talked to the prep-cook Katie (the poor thing has probably hand made a few thousand crab cakes), about what ingredients I should put in.  I then researched other recipes online to see how other people were cleaning up their own salmon cakes.  What came to be MY salmon cake was a combination of ideas.


I start with a 3/4 lb. piece of raw salmon that has been skinned and cubed.  I puree it in a food processor to a consistency that I like.  In a bowl I whisk together two egg whites, 1 tbsp. of Fat Free Greek yogurt, 1 tbsp. of Dijon mustard, salt, pepper, red pepper flakes, and fresh cut parsley.  I then add the salmon to the bowl, as well as 1/4 c. of Panko bread crumbs (do some serious label reading on the Panko that you pick out.  So many of them have enriched products and added sugar.  Avoid these at all cost!).  

I hand mix all the ingredients together, and decide at this point whether or not the consistency is dry enough to form cakes, or if I should add more Panko.  It may take more depending on the moisture in your piece of salmon, however, you don't want it to be over dry, just firm enough to form a patty out of the mix. Use non-stick spray in a pan heated to medium, and sear the cake on each side for about 4-5 minutes.  I like my salmon a little under-cooked, so you may want to keep it on a bit longer.  

For the sauce on top of the salmon cakes, I mix together 1/4 c. of Fat Free Greek yogurt with 1 tbsp. of fresh squeezed lemon, and salt, pepper, red pepper flakes, and garlic powder to taste.  I change the seasoning whenever I like, sometimes adding cumin, and other spices depending on what I'm in the mood for.  Definitely try different combinations and find the ones that you love!